Reproducibility crash course
Learning objectives for today
At the end of today’s session, you
- will be comfortable with markdown/Rmarkdown or text reproducible scripts
- will be comfortable with the standard git pipeline
- will lose fear of git/GitHub conflicts
- will prioritize reproducibility and good computing practices throughout the semester (and beyond)
Pre-class work
Review shell resources and do canvas quiz
Reproducibility
What does it mean to be reproducible? It means that you are able to redo the exact same analysis today, tomorrow or in 10 years and get the same results.
Are people really reproducible? Yes! See Ten year reproducibility challenge
How does a reproducible script even look like?
Let’s start by looking at one of my reproducible scripts: the phylogeny of carrots.
What are the key characteristics of this file?
- It presents a fluid story (that needs to be understandable to you)
- It is written in markdown (text file), not word
- It combines text with shell commands and points at specific scripts (stored in
scriptsfolder) - It begins with a “To do” section: make things easy for yourself
Reproducible script for yourself
Do
- Use textfile, markdown or Rmarkdown so that you can track changes with git (more later)
- Write a story, not just a list of commands
- Explain the steps and rationale for the choices
- Work on the script at the same time as doing the work
- Copy output from commands as well as the commands if the output is needed to understand the story
Don’t
- Use Word
- Wait until the end to create this file (you will have forgotten important things by then)
- Simply copy a list of commands
- Worry about grammar, punctuation, complex sentences
Reproducible script for others
When you will publish your work, you want to make your reproducible script available to others. This is the time to worry about grammar and beautiful writing
- Improve the writing and the presentation by identifying the key sections of the your work and create a workflow around those key sections
- Remove trials and errors from the main workflow and present them as a separate file
- Start the script with dependencies and installation: what do people need to have installed and which versions to run your script?
- Be clear about the datafiles that are used in the script
See the sarscov2phylo github repository for an example.
In this class, we will focus on reproducible scripts for us only (not publication-ready scripts).
Ingredients of a successful reproducible practice
- Text editor: Text notes, Visual Studio Code, Emacs, RStudio
- Knowledge of markdown syntax (which is the same for Rmarkdown)
- Right folder structure
- Knowledge of version control via git/GitHub
2. Markdown syntax
Borrowing Cecile Ane’s class notes.
We can see this format if we look at the local version of the md lecture files. Note that GitHub renders the md files as they would look in html format.
3. Right folder format and filenames
Your project folder should have the following subfolders:
- scripts
- data
- results
- figures
- manuscript
Your files should follow the good naming practices. Read Jenny Bryan’s notes. In a nutshell,
- No spaces
- No symbols
- Meaningful names
- Easy to sort
Points will be deducted for file names that do not follow the good naming practices! Most common mistake: spaces in file names.
4. Version control via git/GitHub
4.1 Why version control with git/github?

- Keep track of history of changes of files in your project
- Time travel: access to files from the past
- Peace of mind about breaking stuff:
Using a Git commit is like using anchors and other protection when climbing. If you’re crossing a dangerous rock face you want to make sure you’ve used protection to catch you if you fall. Commits play a similar role: if you make a mistake, you can’t fall past the previous commit. Coding without commits is like free-climbing: you can travel much faster in the short-term, but in the long-term the chances of catastrophic failure are high! Like rock climbing protection, you want to be judicious in your use of commits. Committing too frequently will slow your progress; use more commits when you’re in uncertain or dangerous territory. Commits are also helpful to others, because they show your journey, not just the destination – Hadley Wickham
4.2 Setting everything up
- Register for github account here; Think carefully about your username!
- Install git
- Configuration of git here
Stop and check
Do you know how to open the terminal? Do you get an actual path (folder location) when you type
which gitin the terminal?If you are a windows user, you might need a bit more one-on-one help, so it is ok to chat more after class
4.3 Now, you want to start your project: git basics
When you are starting your project, you basically need to create the local folder, and the github repository. The order of these steps can vary, but I have found that the more straight-forward order is the following:
- Create a github repository
- Git clone the github repository into a local folder in your computer
- Make local changes, git add, git commit, git push
1. Create a github repository
- Click the green “New” button.
- Choose the repository name:
myProject - Choose to make the repository public
- Choose “yes” to initialize this repository with a README file
2. Git clone in a local folder
In the terminal:
pwd ## make sure you are in the right place
git clone https://github.com/YOU/myProject.git
Here you substitute YOU with your github username.
3. Make local changes:
cd myProject
open README.md
Change the file, then
git add .
git commit -m "updated readme"
git push
If you use RStudio or Visual Studio Code (VSCode), you can do these commands in the text editor directly via some buttons in the interface (not on the terminal).
Summary until this point
- git basics: git add, git commit, git push
- git can be used nicely via the terminal, but there are interfaces (e.g. within RStudio or VSCode) that can be more interactive than the terminal
- We want to work off a text file (or md file), and use the git basics to have our github version updated at all moment
A cautionary tale
More advanced git usage
Other useful git commands
git status          ## check status of repo
git log             ## log of commits
git log --oneline
git diff            ## compare versions
git pull            ## pull commits from remote (github)
git pull --ff-only  ## pull commits avoiding merge issues
Stop and check
The first time that you try to
git push,gitmight need to authenticate your GitHub account. You need to use a “Personal Access Token”, not a password.
Ask ChatGPT
This is a ChatGPT-friendly class! Ask ChatGPT “how do I set up a personal access token to git push?”
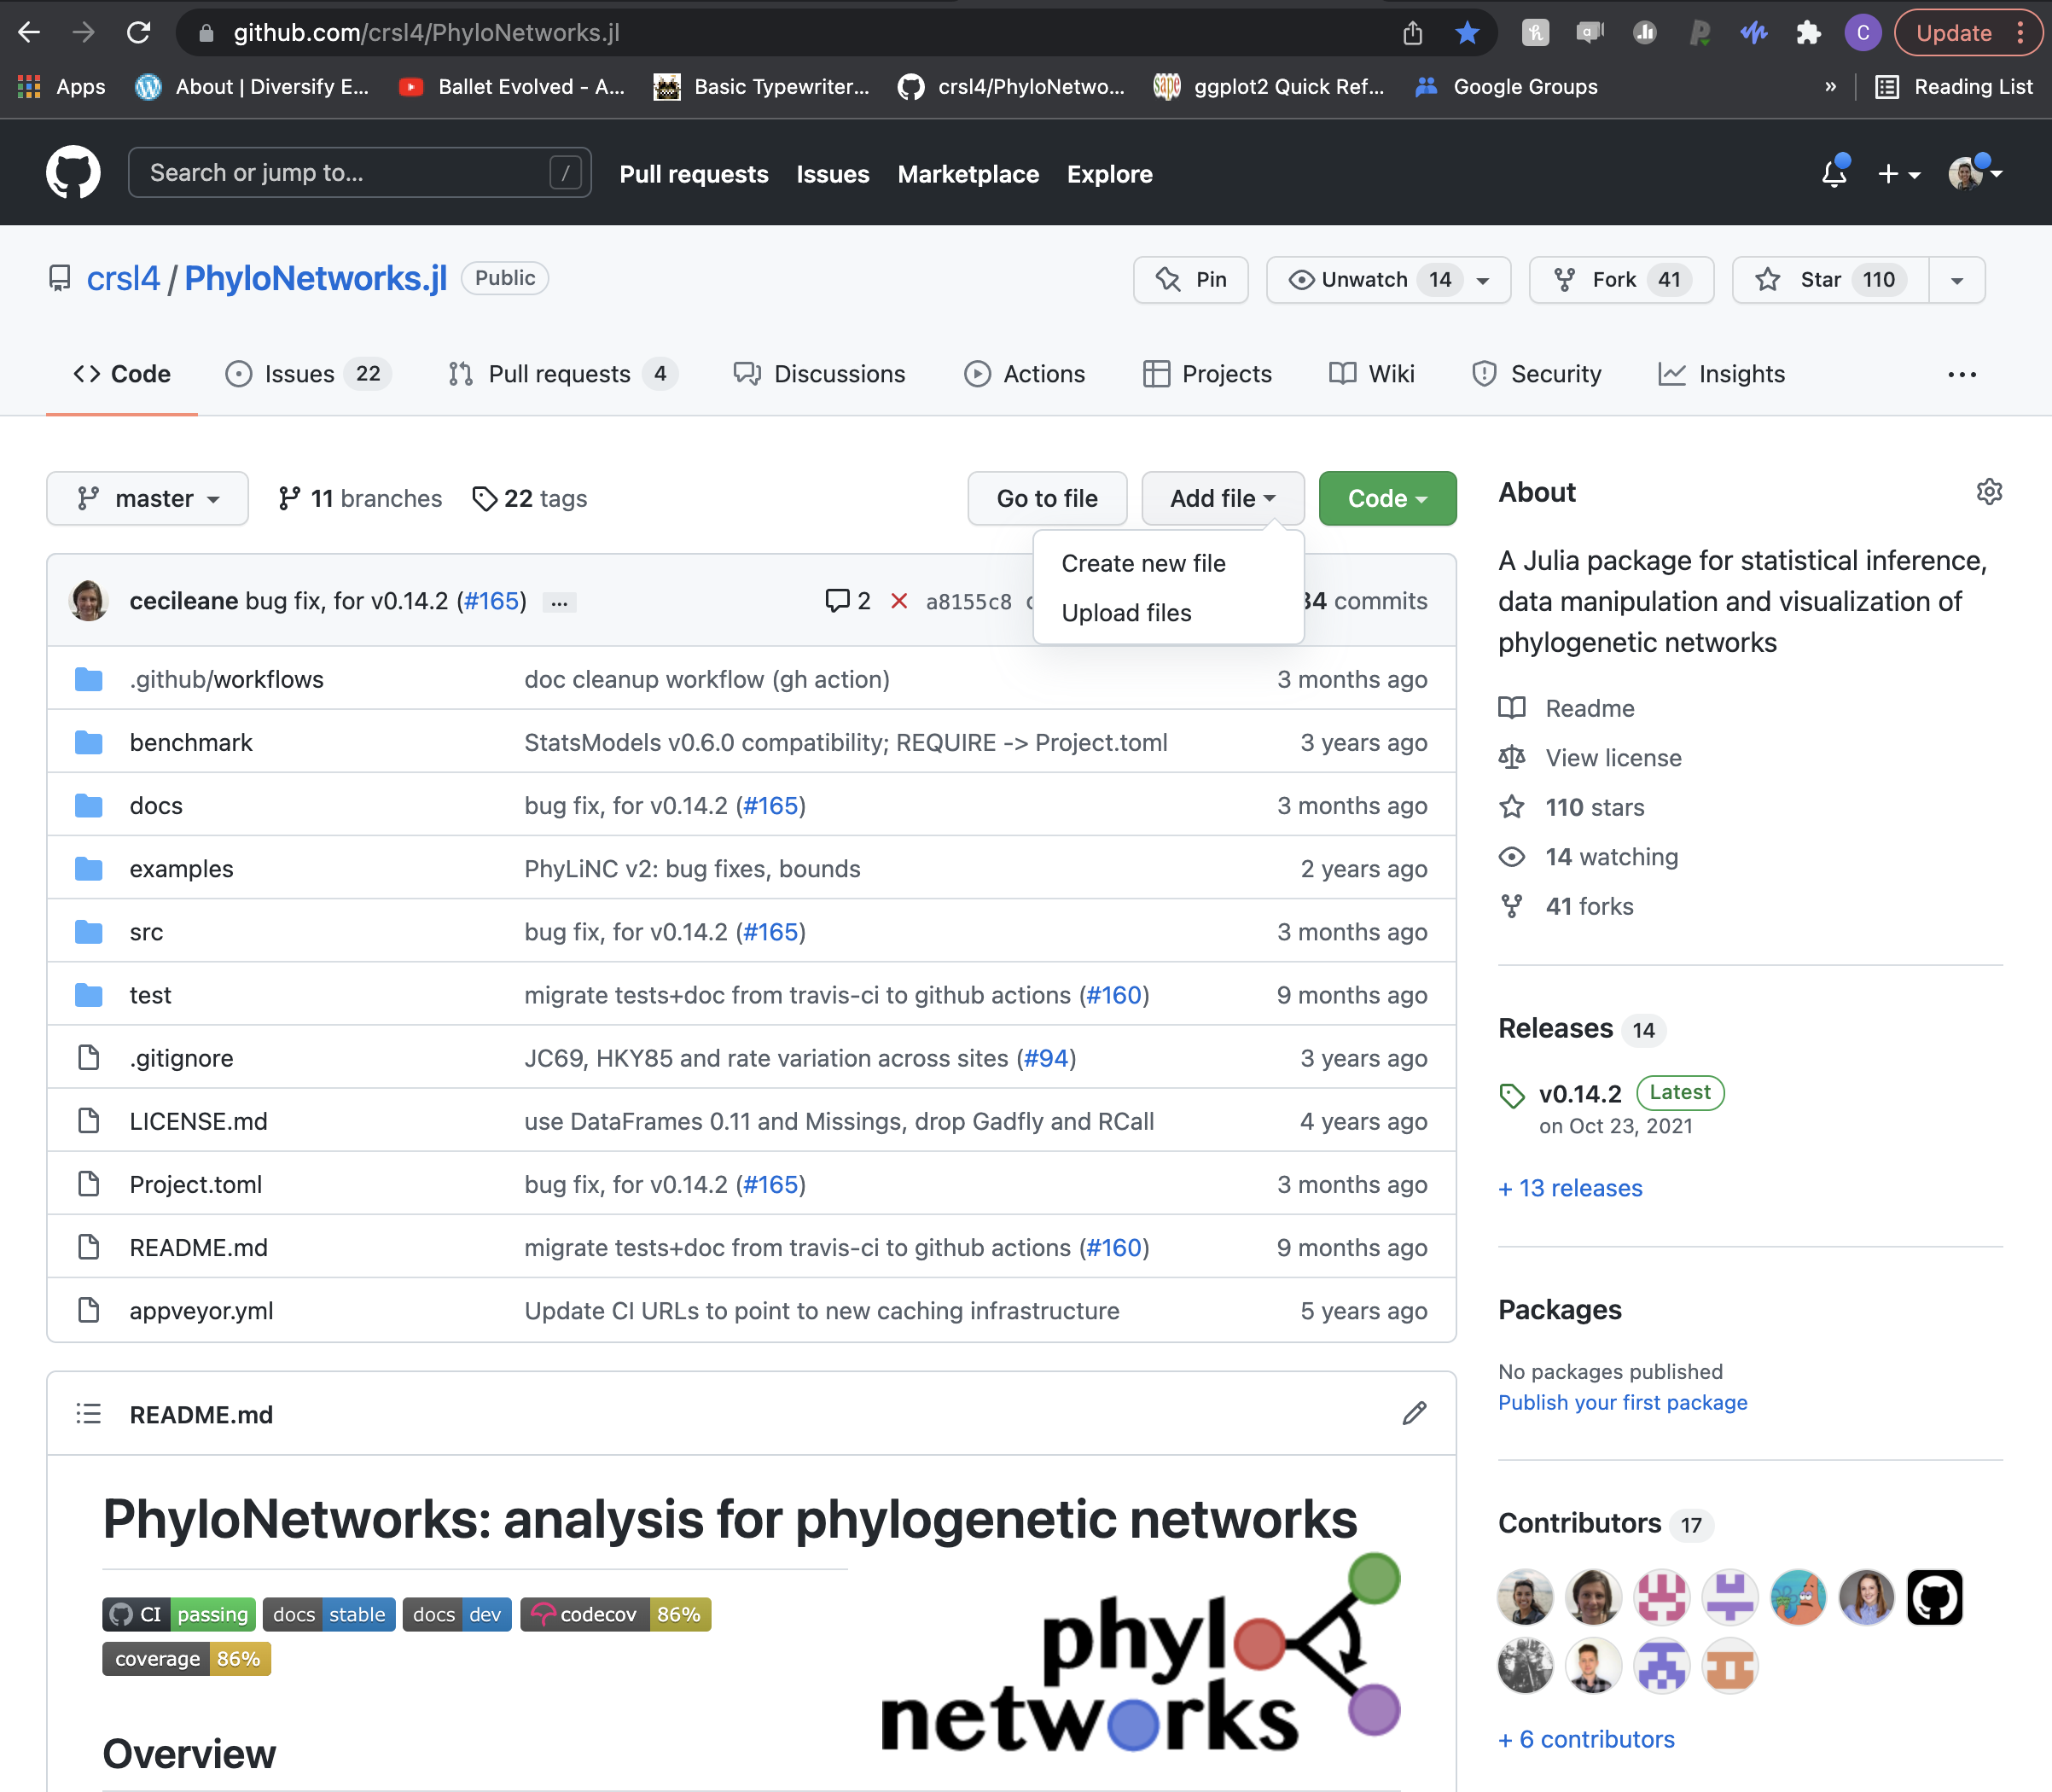
4.4 Forking other people’s repository
Sometimes you identify a repository that does work that you are interested in, but perhaps you would like to do some modification. You can fork this repository, and work on the forked version as if it were your own repository (everything we’ve studied applies).
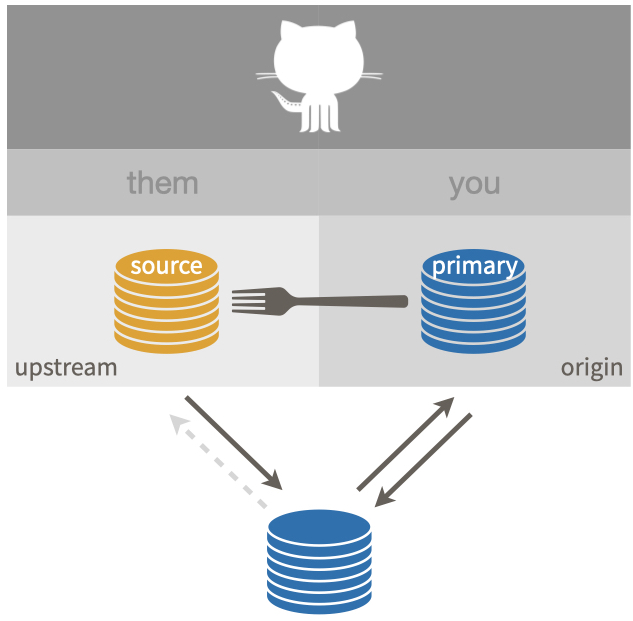
(Images and example from Jenny Bryan’s tutorial)
For this example, the original repository is OWNER/REPO, and after clicking Fork on github, you will have a YOU/REPO.
It is usually recommended to work on a branch when making changes to a forked repository. This is especially true if you intend to create a pull request (more below) so that the original owner can incorporate your changes to the original repository.
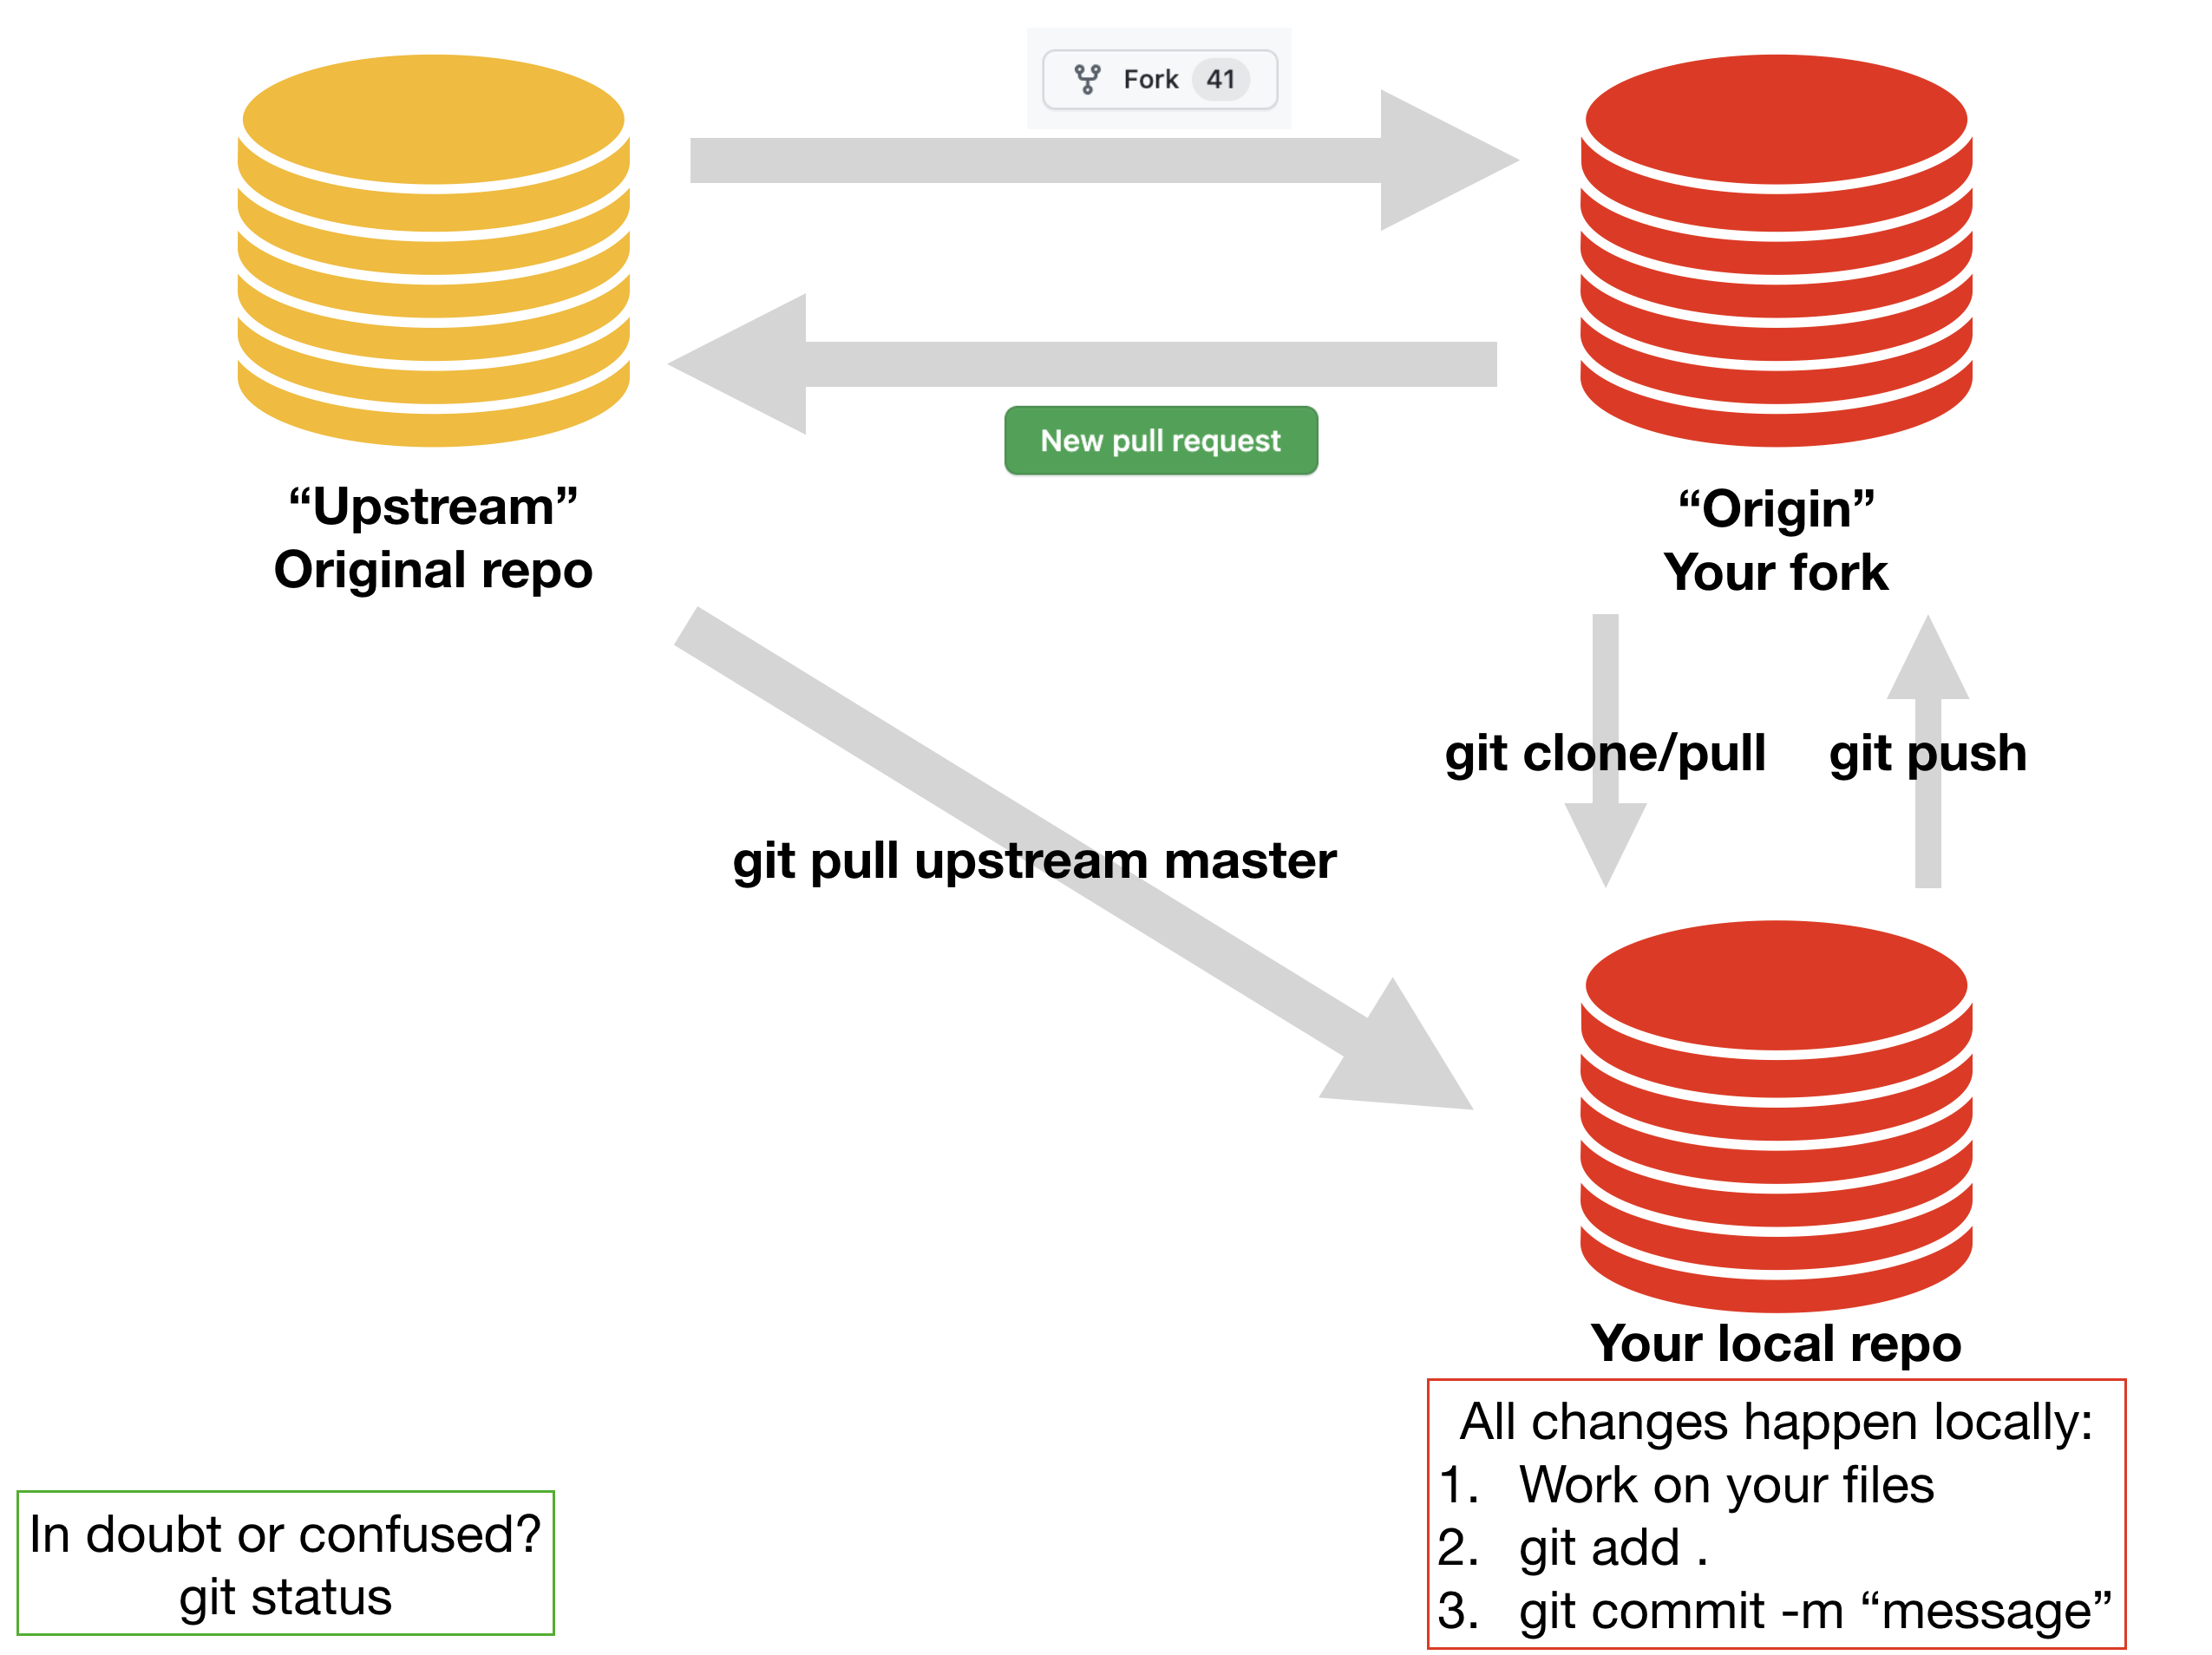
You will then follow the same steps as in “Git basics”: git clone, work, git add, git commit, git push.
If you look closely at your local repo, you will see that it points at your remote version of the repository:
$ git remote -v
origin  https://github.com/YOU/REPO.git (fetch)
origin  https://github.com/YOU/REPO.git (push)
which allows you to push/pull to this forked repository.
But you will most likely also like to pull changes from the original repository
So, you can add the original repo OWNER/REPO as a remote in your repo:
git remote add upstream https://github.com/OWNER/REPO.git
Here we are choosing the name upstream, which is standard practice for the original repository.
Then, when we check the remotes in your local repository, you can see that you have origin pointing at your own forked version YOU/REPO, and upstream pointing at the original repo OWNER/REPO:
$ git remote -v
origin    https://github.com/YOU/REPO.git (fetch)
origin    https://github.com/YOU/REPO.git (push)
upstream  https://github.com/OWNER/REPO.git (fetch)
upstream  https://github.com/OWNER/REPO.git (push)
Now you can pull changes from upstream to keep your forked repo updated with the original repo:
git pull upstream master
After you’ve done work in your fork, and are ready to create a pull request in github, see here.
4.5 Troubleshooting

Reference: xkcd
We all make mistakes with git and it will not be possible to go over the extensive list of things that could go wrong. If you made a mistake, don’t panic! Read these great notes on git/github fixes.
We will go over one type of common issue that will be relevant for our in-class exercise.
4.5.1 Git push/pull issues
Imagine if two people are pushing changes to the same repository. You are working locally, but forget to do git pull before make any changes (or perhaps you and the other people are working at the exact same time and the other person pushes their changes before you). When you try to push your changes, you can’t, because your code has diverged from the remote code:
$ git push
To https://github.com/YOU/REPO.git
 ! [rejected]        master -> master (fetch first)
error: failed to push some refs to 'https://github.com/YOU/REPO.git'
hint: Updates were rejected because the remote contains work that you do
hint: not have locally. This is usually caused by another repository pushing
hint: to the same ref. You may want to first integrate the remote changes
hint: (e.g., 'git pull ...') before pushing again.
hint: See the 'Note about fast-forwards' in 'git push --help' for details.
Merging issues?
Do not panic! Breathe and keep in mind that your work is safe and secure by the power of git.
In the abstract, this is the state on github:
A -- B -- C (on GitHub)
And this is your local state:
A -- B -- D (what you have)
where A, B, C, D represent specific commits.
The easiest thing is to do git pull and then work out the merging issues:
$ git pull
Auto-merging index.html
CONFLICT (content): Merge conflict in index.html
Automatic merge failed; fix conflicts and then commit the result.
The file index.html needs to be resolved.
We can then open the file to see what lines are in conflict.
When you open the index.html file, this is what you see:
<<<<<<< HEAD:index.html
contact : email.support@github.com
=======
please contact us at support@github.com
>>>>>>> remote:index.html
In this conflict, the lines between <<<<<< HEAD:index.html and ====== are the content from the branch you are currently on. The lines between ======= and >>>>>>> remote:index.html are from the remote file version we are merging.
To resolve the conflict, edit this section manually (i.e. open the file) until it reflects the state you want in the merged result. Pick one version or the other or create a hybrid. Also remove the conflict markers <<<<<<, ====== and >>>>>>.
please contact us at email.support@github.com
Now run git add index.html and git commit to finalize the merge. You do git push afterwards with a clean history:
      Remote: A--B--C
Local before: A--B--D
Local after: A--B--D--(merge commit)
                \_C_/
YouTube
You can watch all these concepts again in the YouTube video.
Ask ChatGPT
If it is the first time git pushing from your computer, you will be asked to write your GitHub username and “password”, but it should not be your password, but a “Personal Access Token”. Check out these instructions from ChatGPT to create a token.
In-class exercise with git
Objective: Lose the fear of git conflicts.
Time: 25-30 minutes
Instructions:
Individually,
- Fork the phylo-class-social repository
- Git clone the forked repository in your local machine
git clone [URL] - Add the best book you read in 2023 to the
best-books.mdfile. Use your preferred text editor - Git add, git commit and git push to your fork:
git add . git commit -m "informative message" git push - Do a pull request to merge your additions to the original repository (this is done on GitHub)
Challenge: Your file needs to be compatible with the most updated version of best-books.md
which will change as people merge their additions via pull requests. You will need to manage the conflicts to the file.
git/GitHub summary
Homework
Find description of the reproducibility homework in here.
Learn more about reproducible practices!
The shell
- If you have no idea what the shell is, read these notes
- If you are already familiar with the shell, but want to explore all of its potential, read Cecile Ane’s class notes (Topics 1,2,3,5)
Naming files
- If you did not even know there was a right way to name files, read Jenny Bryan’s notes
Markdown
- If you have never used markdown/Rmarkdown, read Cecile Ane’s class notes
Git/GitHub
- If you have never used git/github, read these software carpentry notes
- If you want to learn more about git and github for R users, read Jenny Bryan’s book
- If you have tried to use git, but made a mistake and don’t know how to fix it, read these notes
Reproducibility
- If you are already a bit reproducible, but want to take your reproducibility skills to the next level, read Karl Broman’s class notes and watch his YouTube video
- Read Simona Picardi’s class notes for a complete overview of computational tools for reproducible science